Licensed to be used in conjunction with basebox, only.
OpenAI-Compatible API User Guide
The basebox's OpenAI-compatible API endpoint.
> "The problem with quotes on the Internet is that you can never know if they are genuine." — Abraham Lincoln (probably)
Table of Contents
- What is This API?
- Getting Your API Token
- How to Use the API Properly
- Testing with curl
- Testing with Swagger UI
- Common Mistakes (and How to Avoid Them)
- Troubleshooting
What is This API?
In plain English: This endpoint lets you use tools and libraries designed for OpenAI's API, but they'll actually talk to basebox's backend. It's like having a universal translator for AI APIs.
What Can You Do?
- Chat Completions: Have conversations with AI models
- List Models: See what models are available
- Streaming: Get responses in real-time (like watching a typewriter in action)
- Tool Calling: Let the AI use functions to do things (like checking the weather or querying databases)
Key Endpoints
POST /v1/chat/completions- Chat with AI modelsGET /v1/models- List available models
Base URL: Your basebox instance URL (e.g., https://your-org.basebox.ai or http://localhost:8888)
Getting Your API Token
Before you can make API calls, you need an API token.
Step-by-Step Guide
-
Log into basebox: Open your basebox instance in a web browser
-
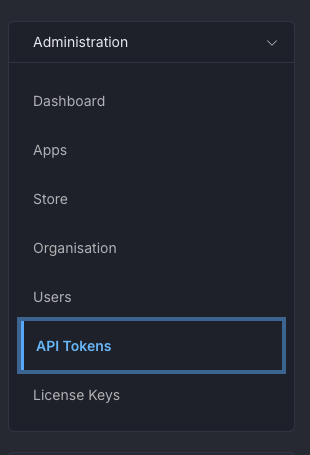
Navigate to API Tokens:
- Go to the Admin section
- Click on "API Tokens"
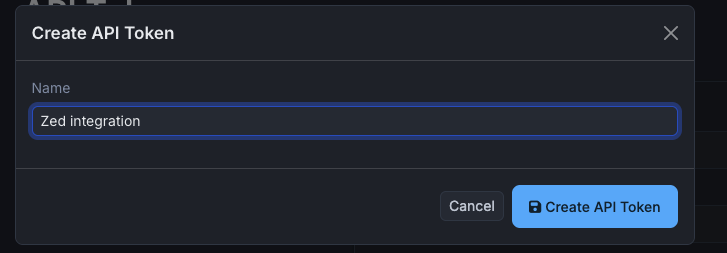
- Create a New Token:
- Click the "Create Token" or "New Token" button
- Give it a memorable name (like "my-awesome-script" or "testing-token")
- Click "Create"
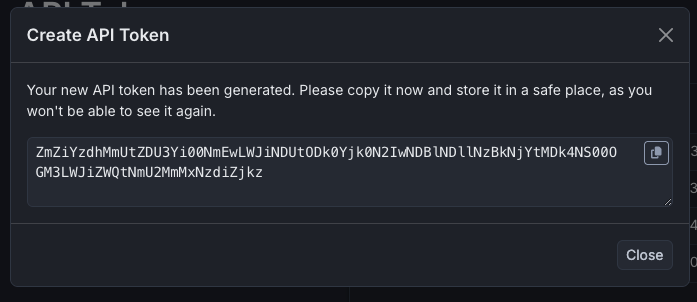
- Copy Your Token:
- ⚠️ IMPORTANT: The token is shown only once! Copy it immediately. ⚠️
- Store it securely (password manager, environment variable, etc.)
- If you lose it - no problem - you'll need to create a new one
Token Security Tip:
Treat your API token like your password
Never commit it to Git
Use environment variables instead
Token Format
Your token will look something like this:
It's a long string of characters. Don't worry if it looks random - that's by design!
How to Use the API Properly
Authentication
Every API request needs authentication. You'll use Bearer token authentication:
Realm/Organization
Depending on your setup, you might need to specify which organization (realm) you're using:
Option 1: Using X-Realm Header (recommended)
Option 2: Using Subdomain
If your basebox instance is at your-org.basebox.ai, the realm is automatically extracted from the subdomain.
Basic Request Structure
Here's what a typical request looks like:
{
  "model": "claude-sonnet-4",
  "messages": [
    {
      "role": "user",
      "content": "Hello, how are you?"
    }
  ],
  "stream": false,
  "temperature": 0.7,
  "max_tokens": 500
}
Understanding the Fields
model: Which AI model to use (check/v1/modelsfor available options)messages: Array of conversation messagesrole:"system","user","assistant", or"tool"content: The actual message textstream:truefor streaming responses,falsefor complete responsetemperature: Creativity level (0.0 = focused, 1.0 = creative)max_tokens: Maximum tokens in the response
Message Roles Explained
Think of roles like characters in a play:
system: The director's notes - sets the AI's behavior and personalityuser: You, the human asking questionsassistant: The AI's responsestool: Results from function calls (if you're using tools)
Example: Multi-Turn Conversation
{
  "model": "claude-sonnet-4",
  "messages": [
    {
      "role": "system",
      "content": "You are a helpful coding assistant."
    },
    {
      "role": "user",
      "content": "What is Rust?"
    },
    {
      "role": "assistant",
      "content": "Rust is a systems programming language..."
    },
    {
      "role": "user",
      "content": "Can you give me a simple example?"
    }
  ]
}
Testing with curl
curl is like a Swiss Army knife for API testing - simple, powerful, and always there when you need it. 🔧
Prerequisites
Make sure you have:
curlinstalled (it's usually pre-installed on macOS/Linux)- Your API token ready
- Your basebox URL
Basic Chat Completion Request
curl -X POST https://your-org.basebox.ai/v1/chat/completions \
  -H "Content-Type: application/json" \
  -H "Authorization: Bearer YOUR_TOKEN_HERE" \
  -H "X-Realm: your-org-name" \
  -d '{
    "model": "claude-sonnet-4",
    "messages": [
      {
        "role": "user",
        "content": "Write a haiku about APIs"
      }
    ],
    "stream": false
  }'
What You'll Get Back
A JSON response that looks like this:
{
  "id": "chatcmpl-abc123",
  "object": "chat.completion",
  "created": 1234567890,
  "model": "claude-sonnet-4",
  "choices": [
    {
      "index": 0,
      "message": {
        "role": "assistant",
        "content": "Endpoints await,\nBearer tokens in the breeze,\nData flows like streams."
      },
      "finish_reason": "stop"
    }
  ],
  "usage": {
    "prompt_tokens": 12,
    "completion_tokens": 17,
    "total_tokens": 29
  }
}
Streaming Request
Want to see the response as it's generated? Use streaming:
curl -X POST https://your-org.basebox.ai/v1/chat/completions \
  -H "Content-Type: application/json" \
  -H "Authorization: Bearer YOUR_TOKEN_HERE" \
  -H "X-Realm: your-org-name" \
  -d '{
    "model": "claude-sonnet-4",
    "messages": [
      {
        "role": "user",
        "content": "Count to 10 slowly"
      }
    ],
    "stream": true
  }'
You'll see Server-Sent Events (SSE) streaming in:
data: {"id":"chatcmpl-...","object":"chat.completion.chunk",...}

data: {"id":"chatcmpl-...","choices":[{"delta":{"content":"1"}}]}

data: {"id":"chatcmpl-...","choices":[{"delta":{"content":" "}}]}

data: {"id":"chatcmpl-...","choices":[{"delta":{"content":"2"}}]}

...

data: [DONE]
List Available Models
curl -X GET https://your-org.basebox.ai/v1/models \
  -H "Authorization: Bearer YOUR_TOKEN_HERE" \
  -H "X-Realm: your-org-name"
Using Environment Variables (Pro Tip)
Save your token in an environment variable to avoid typing it every time:
# Set your token (add this to your ~/.bashrc or ~/.zshrc)
export BASEBOX_API_TOKEN="your-token-here"
export BASEBOX_URL="https://your-org.basebox.ai"
export BASEBOX_REALM="your-org-name"

# Now use it in curl
curl -X POST $BASEBOX_URL/v1/chat/completions \
  -H "Content-Type: application/json" \
  -H "Authorization: Bearer $BASEBOX_API_TOKEN" \
  -H "X-Realm: $BASEBOX_REALM" \
  -d '{
    "model": "claude-sonnet-4",
    "messages": [{"role": "user", "content": "Hello!"}]
  }'
Testing with Swagger UI
What is Swagger UI?
Swagger UI is like an interactive playground for APIs. Instead of writing curl commands or code, you can:
- Explore endpoints visually
- Test API calls directly in your browser
- See request/response schemas automatically
- Try different parameters without writing code
Think of it as a "try before you code" tool. It's perfect for:
- Learning how the API works
- Quick testing and experimentation
- Sharing API examples with teammates
- Debugging issues
Fun Fact: Swagger UI generates its interface from an OpenAPI specification - a machine-readable description of the API. It's like having a map that also shows you how to use each road!
Accessing Swagger UI
- Open your browser and navigate to:
Or for local development:
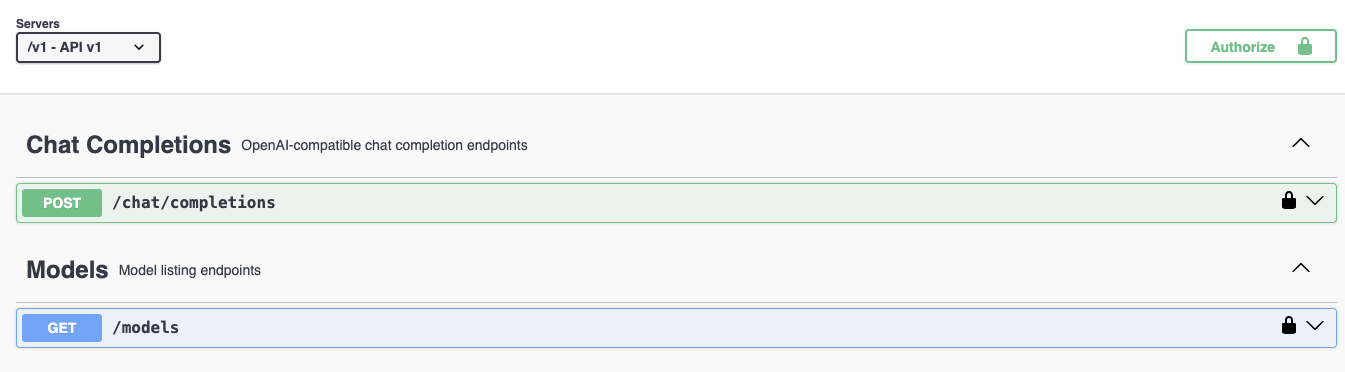
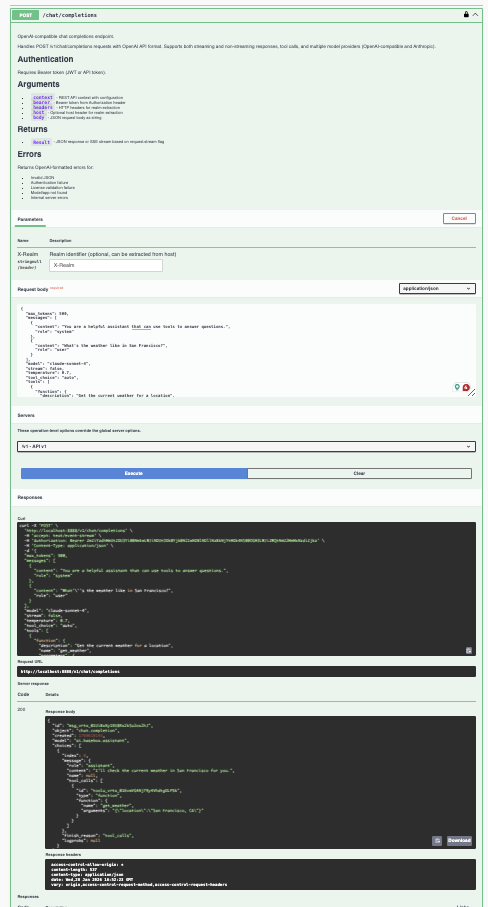
2. You should see a page that looks like this: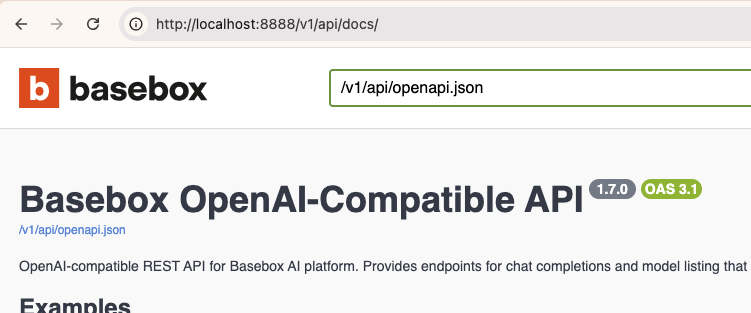
Step-by-Step: Your First Swagger UI Request
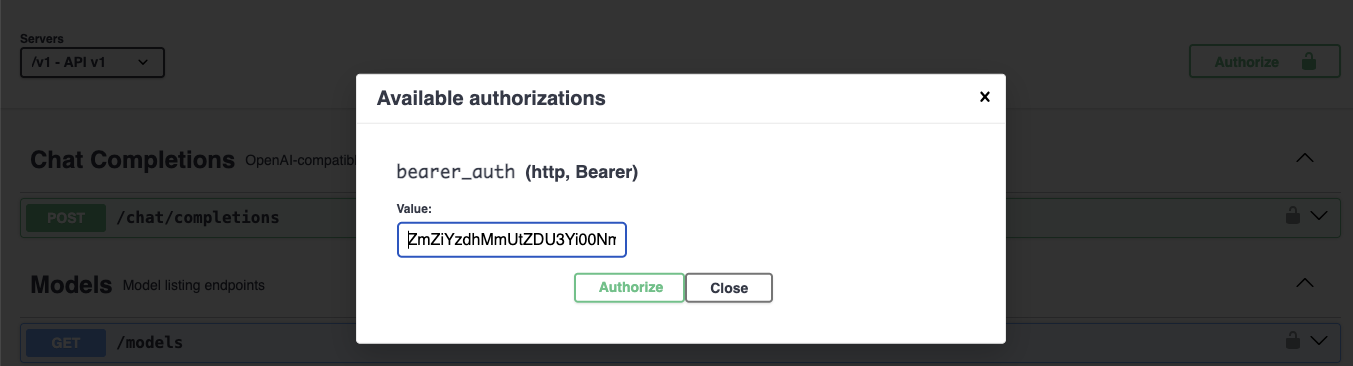
Step 1: Authorize
Before you can make requests, you need to authenticate:
- Click the "Authorize" button (usually at the top right)
- In the popup, you'll see a field for "bearer_auth"
- Enter your token:
YOUR_TOKEN_HERE - Click "Authorize"
- Click "Close"
You should see a 🔒 lock icon next to the endpoints, indicating you're authenticated.
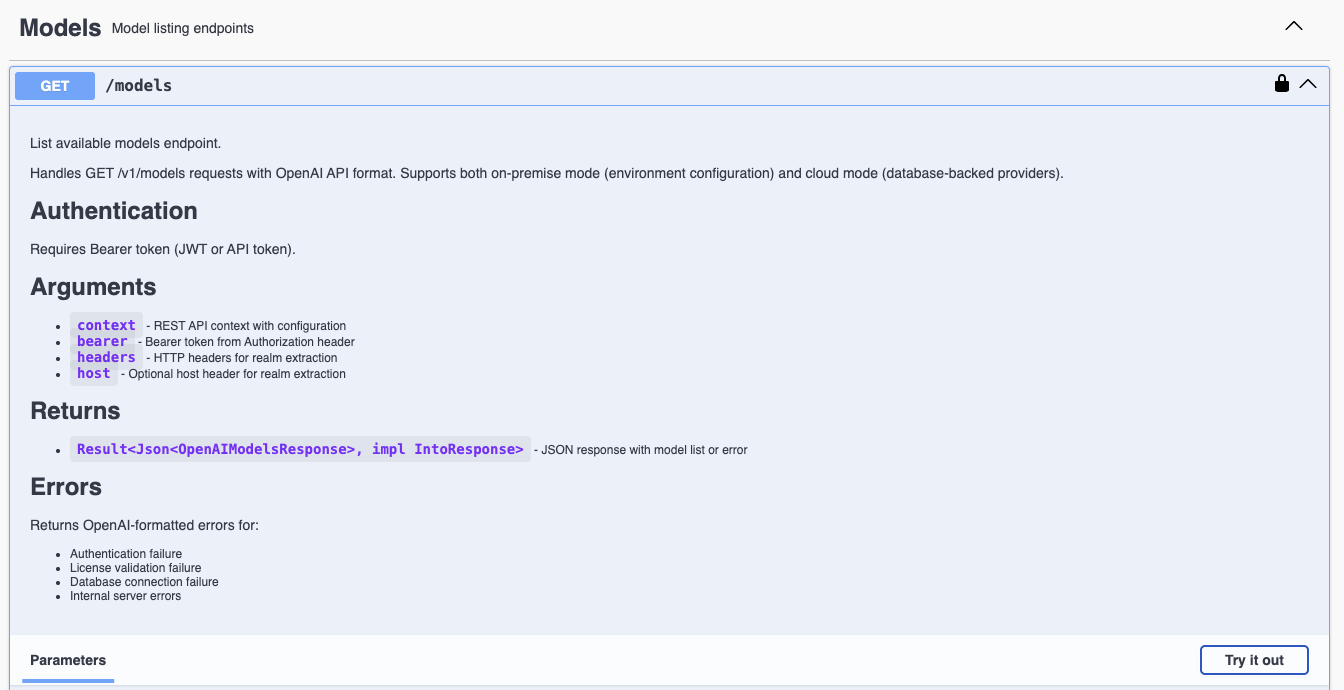
Step 2: Explore Available Models
- Find the "Models" section
- Click on "GET /v1/models"
- Click "Try it out"
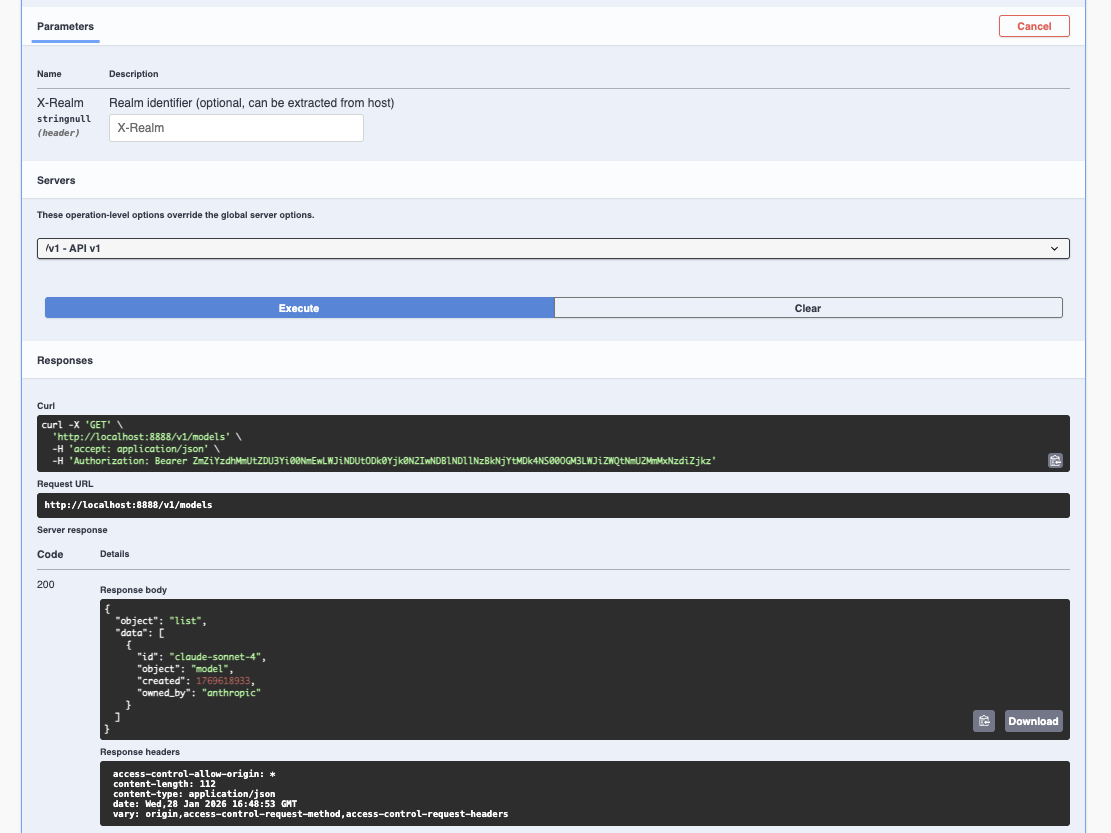
- Click "Execute"
You'll see:
- Request URL: The actual URL that was called
- Response Code: HTTP status (200 = success!)
- Response Body: JSON list of available models
Step 3: Make a Chat Completion Request
- Find the "Chat Completions" section
- Click on "POST /v1/chat/completions"
- Click "Try it out"
You'll see a request body editor with an example JSON. Modify it:
{
  "model": "claude-sonnet-4",
  "messages": [
    {
      "role": "user",
      "content": "Explain APIs like I'm 5 years old"
    }
  ],
  "stream": false,
  "temperature": 0.7,
  "max_tokens": 200
}
- Click "Execute"
- Scroll down to see the response!
Understanding Swagger UI Features
Schema Documentation
Each endpoint shows:
- Parameters: What you can send
- Request Body: The JSON structure expected
- Response: What you'll get back
- Example Values: Pre-filled examples to get you started
Testing Different Scenarios
Try these in Swagger UI:
1. Simple Question:
2. System Message:
{
  "model": "claude-sonnet-4",
  "messages": [
    {"role": "system", "content": "You are a pirate."},
    {"role": "user", "content": "Tell me about APIs"}
  ]
}
3. Multi-Turn Conversation:
{
  "model": "claude-sonnet-4",
  "messages": [
    {"role": "user", "content": "What is 2+2?"},
    {"role": "assistant", "content": "2+2 equals 4."},
    {"role": "user", "content": "What about 2+3?"}
  ]
}
Pro Tips for Swagger UI
-
Copy as cURL: After executing a request, Swagger UI can show you the equivalent curl command - great for learning!
-
Schema Validation: Swagger UI validates your JSON before sending - catch errors early!
-
Response Examples: Expand the "Example Value" sections to see what responses look like
-
Error Testing: Try invalid requests to see what error responses look like
Troubleshooting Swagger UI
Problem: "401 Unauthorized"
Solution: Make sure you clicked "Authorize" and entered your token correctly (including "Bearer ")
Problem: "404 Not Found"
Solution: Check that your URL is correct - should end with /v1/api/docs
Problem: Can't see the "Authorize" button
Solution: Some browsers block popups - check your browser settings
Problem: Token not persisting
Solution: Swagger UI saves tokens in browser storage - try refreshing the page
Common Mistakes (and How to Avoid Them)
Mistake #1: Forgetting the "Bearer" Prefix
[-] Wrong:
[+] Right:
Why it matters: The API expects "Bearer" followed by a space, then your token. Without it, authentication fails.
Mistake #2: Missing Content-Type Header
[-] Wrong:
[+] Right:
Why it matters: The server needs to know you're sending JSON, not form data.
Mistake #3: Wrong Message Role
[-] Wrong:
[+] Right:
Valid roles: "system", "user", "assistant", "tool"
Mistake #4: Forgetting the Realm
If your setup requires it:
[-] Wrong:
[+] Right:
Mistake #5: Invalid JSON
[-] Wrong:
{
  "model": "claude-sonnet-4",
  "messages": [
    {"role": "user", "content": "Hello"}  // Missing comma
    {"role": "assistant", "content": "Hi"}
  ]
}
[+] Right:
{
  "model": "claude-sonnet-4",
  "messages": [
    {"role": "user", "content": "Hello"},
    {"role": "assistant", "content": "Hi"}
  ]
}
Pro tip: Use a JSON validator or your editor's JSON mode to catch these errors.
Mistake #6: Using Wrong Model Name
[-] Wrong:
[+] Right:
Always check /v1/models to see what models are available.
Troubleshooting
"The problem with troubleshooting is that trouble shoots back." — Unknown
Error: 401 Unauthorized
What it means: Your token is invalid or missing.
Solutions:
- Check that you included "Bearer " before your token
- Verify your token is correct (copy-paste it again)
- Make sure the token hasn't been deleted
- Check that REST API is enabled in your basebox instance
Error: 403 Forbidden
What it means: Your organization doesn't have a valid license or permission.
Solutions:
- Check your organization's license status
- Contact your administrator
- Verify you're using the correct realm/organization
Error: 400 Bad Request
What it means: Your request format is incorrect.
Solutions:
- Validate your JSON (use a JSON validator)
- Check that required fields are present (
model,messages) - Verify message roles are valid (
"user","assistant", etc.) - Check the Swagger UI schema for the correct format
Error: 404 Not Found
What it means: The endpoint doesn't exist or the URL is wrong.
Solutions:
- Verify your base URL is correct
- Check that the path is
/v1/chat/completions(not/api/v1/...) - Ensure the OpenAI API is enabled on your instance
Error: 500 Internal Server Error
What it means: Something went wrong on the server side.
Solutions:
- Check server logs (if you have access)
- Try again - might be a temporary issue
- Contact support with:
- Your request (without the token!)
- The error response
- Timestamp of when it happened
Streaming Issues
Problem: Streaming responses stop abruptly
Solutions:
- Check your network connection
- Increase timeout settings in your client
- Verify the model supports streaming
- Check server logs for errors
Model Not Found
Error: Model "xyz" not found
Solutions:
- Call
/v1/modelsto see available models - Check model name spelling (case-sensitive!)
- Verify the model is configured for your organization
Quick Reference
Endpoints
| Method | Endpoint | Description |
|---|---|---|
POST |
/v1/chat/completions |
Chat with AI models |
GET |
/v1/models |
List available models |
GET |
/v1/api/docs |
Swagger UI documentation |
Required Headers
Content-Type: application/json
Authorization: Bearer YOUR_TOKEN_HERE
X-Realm: your-org-name  (if required)
Minimum Request
Quick curl Template
curl -X POST YOUR_URL/v1/chat/completions \
  -H "Content-Type: application/json" \
  -H "Authorization: Bearer YOUR_TOKEN" \
  -H "X-Realm: YOUR_REALM" \
  -d '{
    "model": "claude-sonnet-4",
    "messages": [{"role": "user", "content": "YOUR_MESSAGE"}]
  }'
Next Steps
Now that you've mastered the basics:
- Explore Tool Calling: Learn how to make the AI use functions
- Optimize Your Requests: Experiment with temperature, max_tokens, etc.
- Build an Integration: Use your favorite programming language's OpenAI client library
- Read the Architecture Docs: Check out
openai-api-architecture.mdfor deep technical details
Final Thoughts
"The early bird might get the worm, but the second mouse gets the cheese." — Unknown
Happy coding! 🚀
Last updated: January 2026
Questions? Check the architecture documentation or contact support.